


Extract Date from Timestamp Excel – a big problem to identify those dates and how to extract them?
Cells having ‘Date with time‘ and ‘Date without time‘ – it does matter in a sense, but it really matters in data analysis, MIS preparation when we compare with the two dates.
Suppose, we have a large master data with some activity dates and want to recheck these dates from another file for billing purposes, both dates are not matched to each other even they are the same dates and it was then painful for anyone.
There are 4 methods to extract date from timestamp Excel:
(01) By using the Text to Columns;
(02) By using the INT () function
(03) By using the TRUNC () function
(04) By using the CONCATENATE () function
(I). HOW TO IDENTIFY THE CELLS HAVING DATE & TIME ALTOGETHER?
Firstly, we need to identify those cells before extract date from timestamp Excel.
We can identify those cells having both date and time altogether in two ways:
(01) By comparing with two dates;
(02) By changing the date format into the general format.
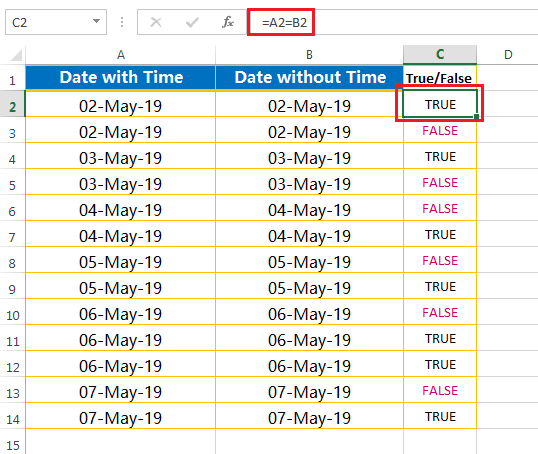
A. METHOD 1: BY COMPARING WITH TWO DATES
While comparing two dates (of course, one date should have no timestamp), we can easily identify the cells having the date and time altogether. We can compare through the ‘True’ and ‘False’ method. The Syntax is: =A2=B2 and copied down the formula till the end of the range.
➢ True – indicates both dates are unique.
➢ False – indicates one of them having a time extension.
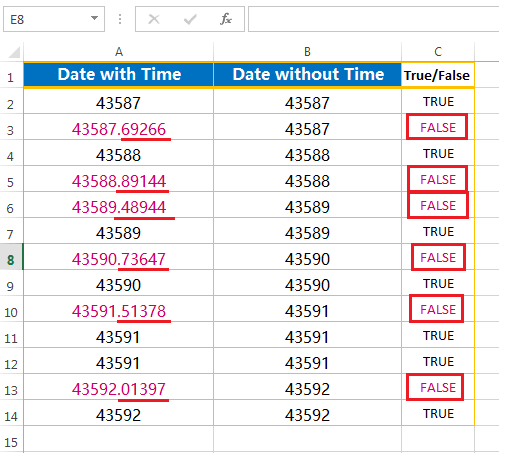
B. METHOD 2: BY CHANGING THE DATE FORMAT INTO THE GENERAL FORMAT
Alternatively, if we can convert the date format into the general format, we find that some cell values having point extensions, that indicate that those cells having a date with a time.
We can do this in three ways, but before we proceed to select the column range individually (A2:A14) or entirely (A2:B14).
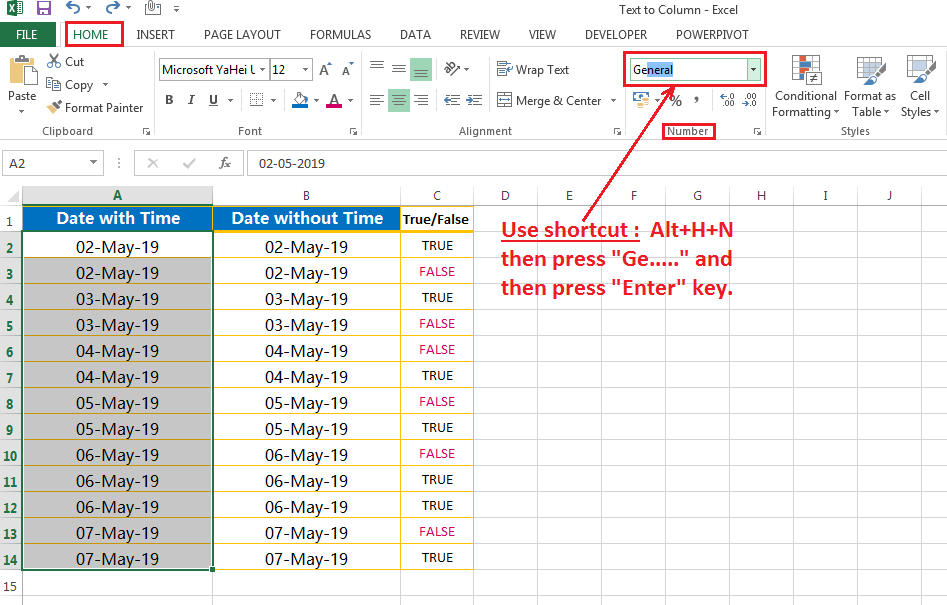
(01) To Apply the ‘General’ Format: using the Excel Shortcut
(02) To Apply the ‘General’ Format: using the Alternate Excel Shortcut
(03) To Apply the ‘General’ Format: using the Ribbon
(01) TO APPLY THE ‘GENERAL’ FORMAT: USING THE EXCEL SHORTCUT (ALT+H+N)
It is the smart way to use the Excel shortcut to apply the ‘General’ format.
➢ Method 1: Select the range ➪ Use the Excel shortcut Alt+H+N (sequentially press Alt, H, N on the keyboard) to activate the ‘Number’ Format box under the ‘Home‘ tab ➪ then just type ‘Gen‘ ; Excel, by default, suggests the category ‘General‘ in the box.
➢ Method 2: Equivalently, select the range ➪ Press Alt+H+N (sequentially press Alt, H, N on the keyboard) to activate the ‘Number’ Format box ➪ Then press Alt+⬇ which will open the drop-down list ➪ Choose the ‘General‘ category from the drop-down list ➪ then press Enter.
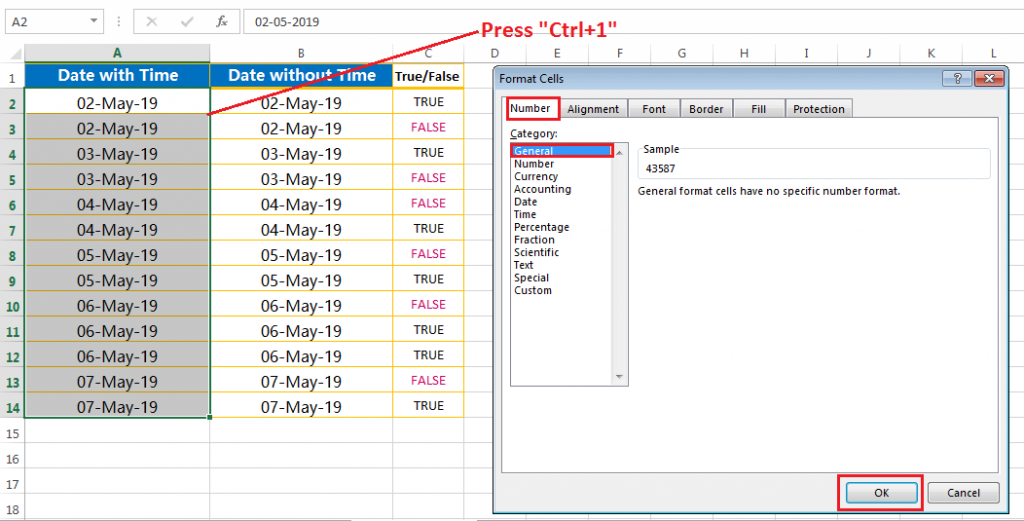
(02) TO APPLY THE ‘GENERAL’ FORMAT: USING THE ALTERNATE EXCEL SHORTCUT (CTRL+1)
Alternatively, we can apply another Excel shortcut to apply the ‘General’ format.
Select the range ➪ Apply keyboard shortcut Ctrl+1 which will open the Format Cells dialog box ➪ Then click on the ‘Number‘ tab ➪ select the ‘General‘ format ➪ click OK or press Enter.
(03) TO APPLY THE ‘GENERAL’ FORMAT: USING THE RIBBON
It is a manual process.
➢ Method 1: Go to the Home tab ➪ Click on the Alignment dialog box launcher is located on the right side bottom corner in the Alignment group, which will open the ‘Format Cells‘ dialog box ➪ Select ‘General’ ➪ Click on OK or press Enter.

➢ Method 2: Go to the Home tab ➪ Click on the Number dialog box launcher is located on the right side bottom corner in the Number group, which will open the ‘Format Cells‘ dialog box ➪ Select ‘General’ ➪ Click on OK or press Enter.

After applying one of the above mentioned three methods, the Date format will be changed in the General format.
The same method should be applied in both the columns (i.e., Date with Time and Date without time) and it seems to be:
(II). HOW TO EXTRACT DATE FROM TIMESTAMP EXCEL?
A. EXTRACT DATE FROM TIMESTAMP: BY CHANGING THE ‘TEXT TO COULMNS WIZARD’
‘Convert Text to Columns Wizard‘ is one of the best ways to extract date from timestamp in Excel. The process is as follows:
(01) To Change the Date format into the General format;
(02) To Split the point extension after the values;
(03) To Change the General format into the Date format.
(01) TO CHANGE THE DATE FORMAT INTO THE GENERAL FORMAT
We had already mentioned the process above, just follow it carefully.
(02) TO SPLIT THE POINT EXTENSION AFTER THE VALUES
In the next step, after identifying the cells or columns, we have to use the ‘Convert Text to Columns Wizard‘ to remove/split the point extensions from the values.
• Add two additional columns in-between ‘Date with Time’ and ‘Date without Time’ by using the Excel shortcut Ctrl + +(plus).
■ Note: We had detail discussed on Excel shortcuts in separate two tutorials, suggested you read these tutorials:
80+ Excel Shortcuts with ALT Key || Best Hotkey of Keyboard Shortcuts
90+ Best Excel CTRL Shortcuts | Useful Keyboard Shortcuts |
• Select the range A2:A14.
• Press Alt+D+E (sequentially press Alt, D, E) or Alt+A+E (sequentially press Alt, A, E) on the keyboard which will open the ‘Convert Text to Columns Wizard‘.
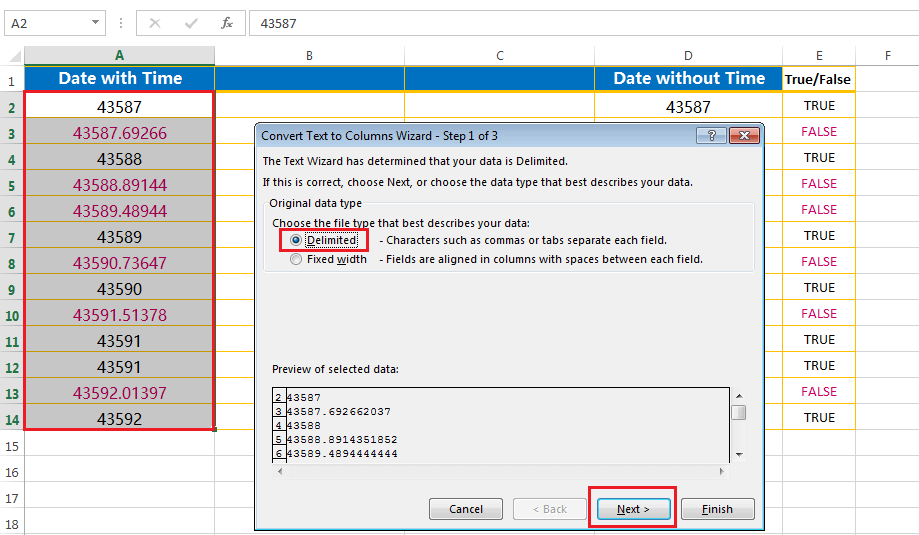
• In Step 1, Excel, by de fault, selects the ‘Delimited‘ radio button (if not, then select this radio) ➪ Press Enter or click Next.
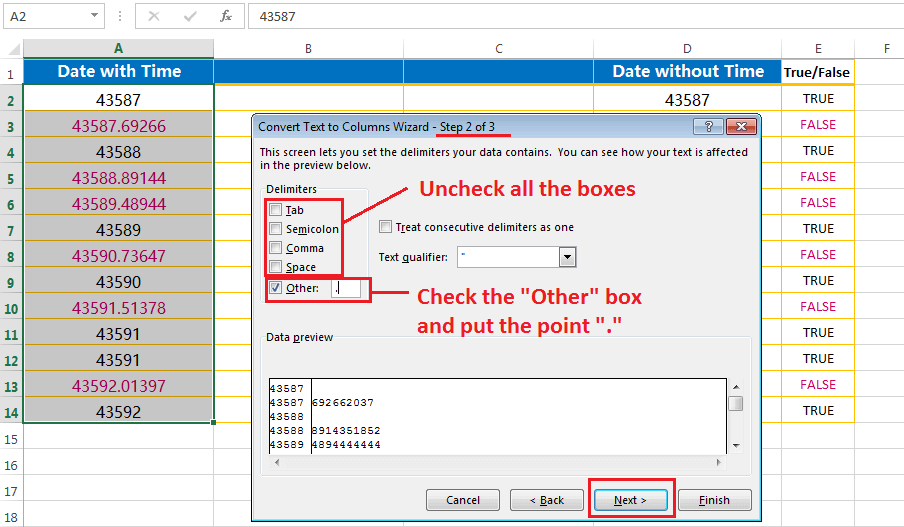
• In Step 2, select the only checkbox ‘Other’ and enter a point (.) in the box to the right of it because the point is used here as a delimiter. Make sure that other checkboxes should be unchecked (if any) ➪ Press Enter or click Next.
• In Step 3, Excel by default selects the ‘General’ radio button and we select the destination cell in B2 to avoid the overwriting of existing data.
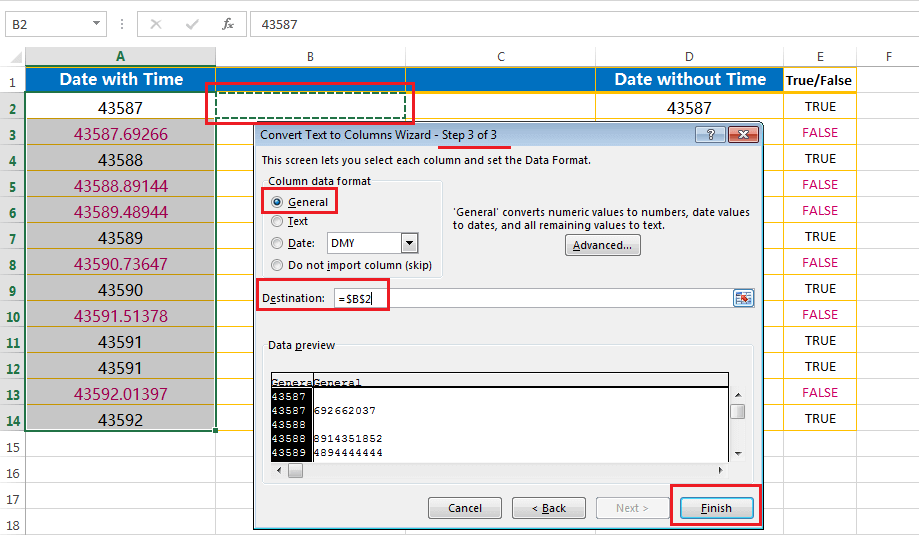
• Click on Finish or press Enter on the keyboard.
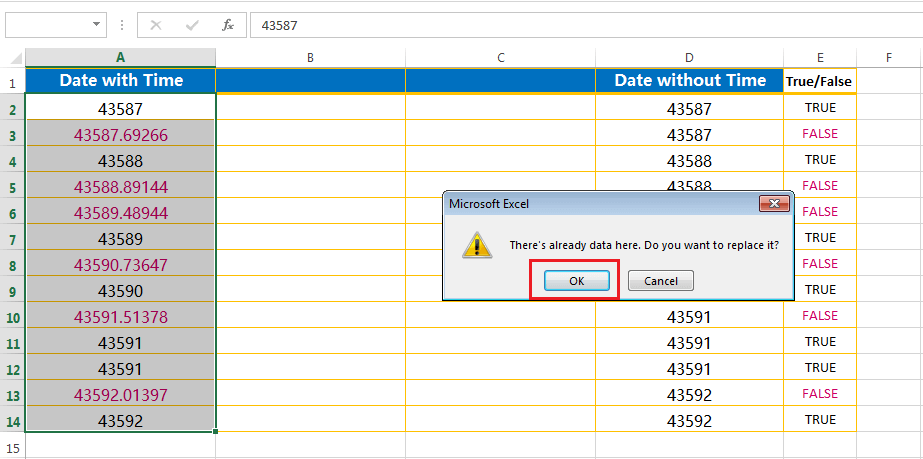
A new window appears and asking for replacing the existing data. Click on OK or press Enter.
• This would instantly give the results in two parts – the integer part in one column and the fraction part in another column.

(03) CHANGE THE GENERAL FORMAT INTO THE DATE FORMAT
Select both columns B and D by pressing the Ctrl key and then press Ctrl+Shift+# for date formatting.
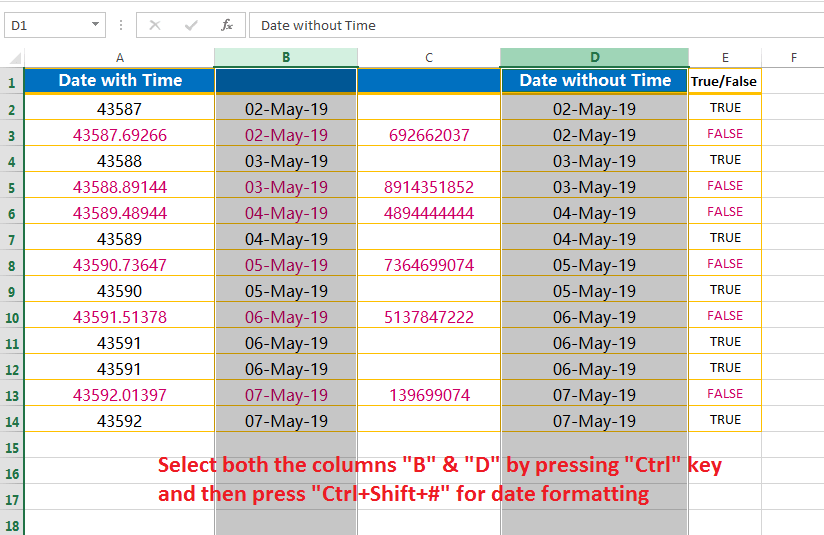
(04) REARRANGE THE DATA PROPERLY
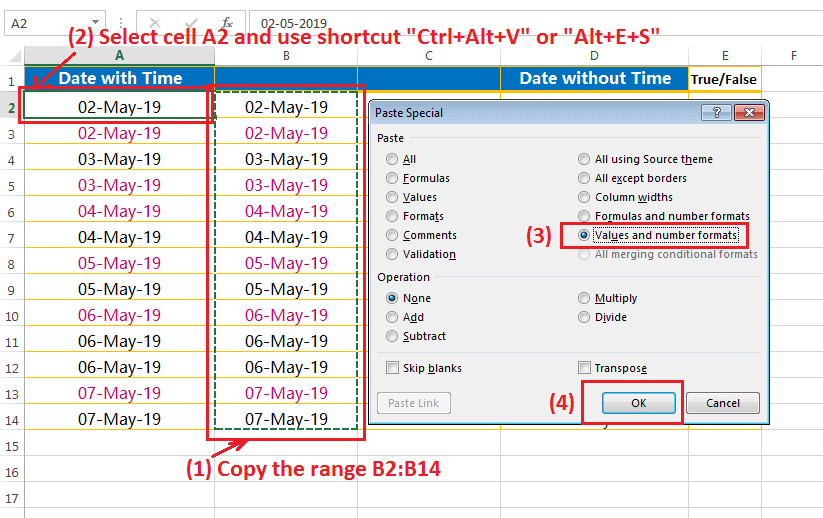
Rearrange the data properly is a very common word but it is very important in data analysis and report preparation. After copied the date ranges B2:B14, paste it to a new location i.e.,in cell A2 (the starting cell where to paste the range).
Remember that we should try to avoid the normal paste (Ctrl+V), rather we would like to use Values and number formats (Alt+Ctrl+V+U or Alt+E+S+U) or ‘Values‘ (Alt+Ctrl+V+V or Alt+E+S+V) in the Paste Special dialog box.
The reason behind this is to keep our cell formatting (like font, font size, font color, text color, etc.) as it is already have previously.
The entire range would instantly convert from formulas to values.
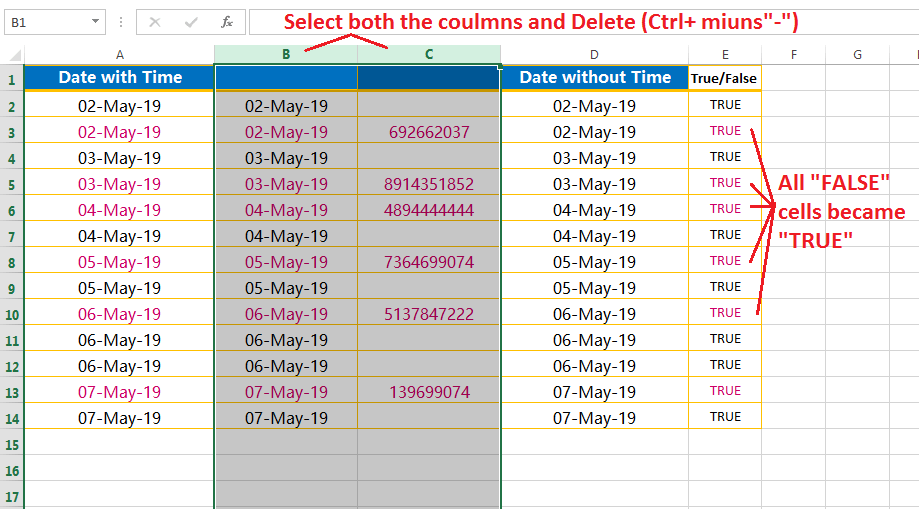
After pasting the dates from column B to column A, please notice that all the ‘False’ cells become ‘True’.
Then select the unused columns like B and C and delete them by using the Excel shortcut Ctrl + minus (-).
That’s it!
B. EXTRACT DATE FROM TIMESTAMP: USING THE INT() FUNCTION
Extract Date from Timestamp – If we have dates with time values and we want to extract only the date portion, we can use a formula that uses the INT function.
Excel identifies the date-time format as numbers with two parts – (i) serial numbers as dates and (ii) fractional values as times. For example, Excel recognizes 06-10-2019 14:11 PM as the number 43744.59, where 43744 is the date part and .59 is the time part.
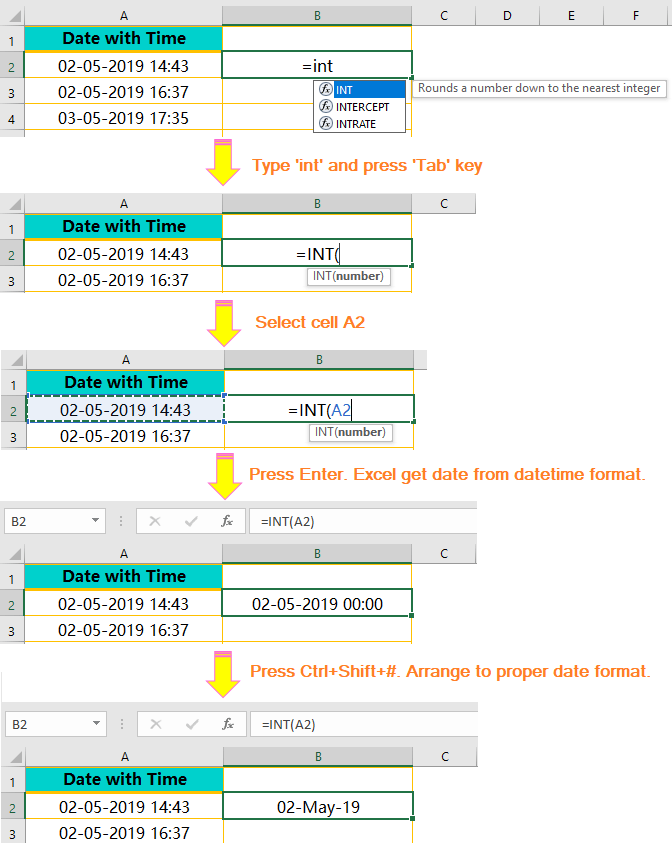
So in that case, we can extract date from date-time format by using a formula that uses either INT function or TRUNC function. Suppose, cell A1 contains the date-time format, 06-10-2019 14:11 PM, the formula has returned the date part 06-10-2019 as number format (43744).
The Syntax for the INT() function is: =INT(number)
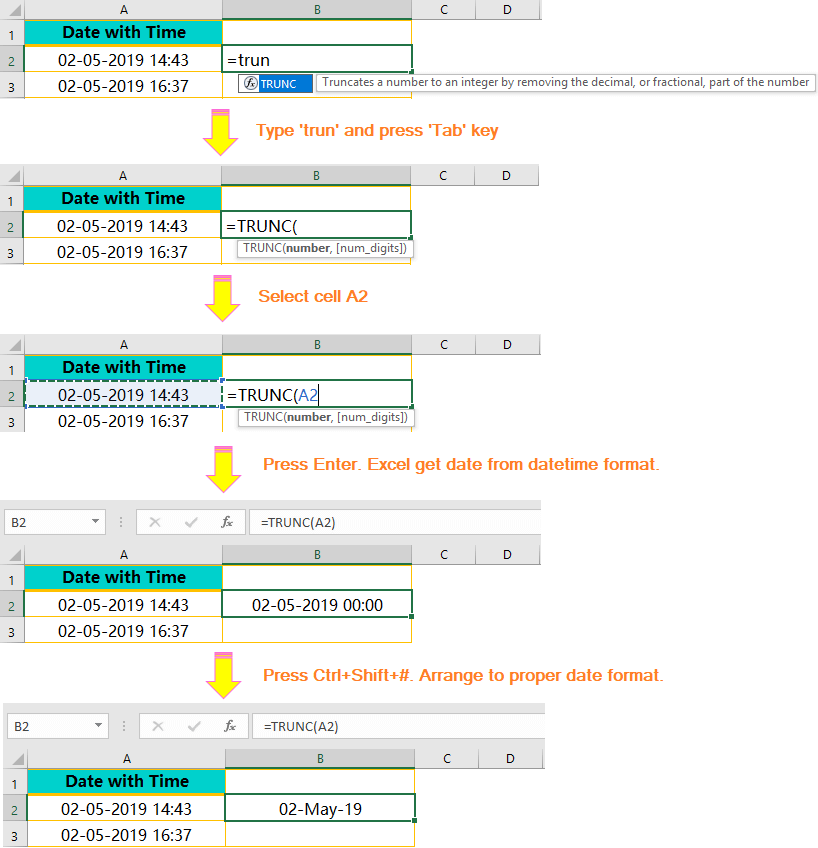
C. EXTRACT DATE FROM TIMESTAMP: USING THE TRUNC() FUNCTION
Alternatively, TRUNC() is the function that simply extracts the date from the timestamp, removing the extra digits without performing any rounding.
However, INT() function is the simpler of the two, as it always rounds to whole numbers. We need only specify the number we want rounded.
In each case, Excel discards the decimal portion. TRUNC () is similar to INT (), except it uses a second argument specifying the number of decimal places we want to preserve. This argument is optional, and if we leave it out, TRUNC () and INT () behave exactly the same with positive numbers.
The Syntax for the TRUNC function is: =TRUNC(number_to_round, [number_of_digits])
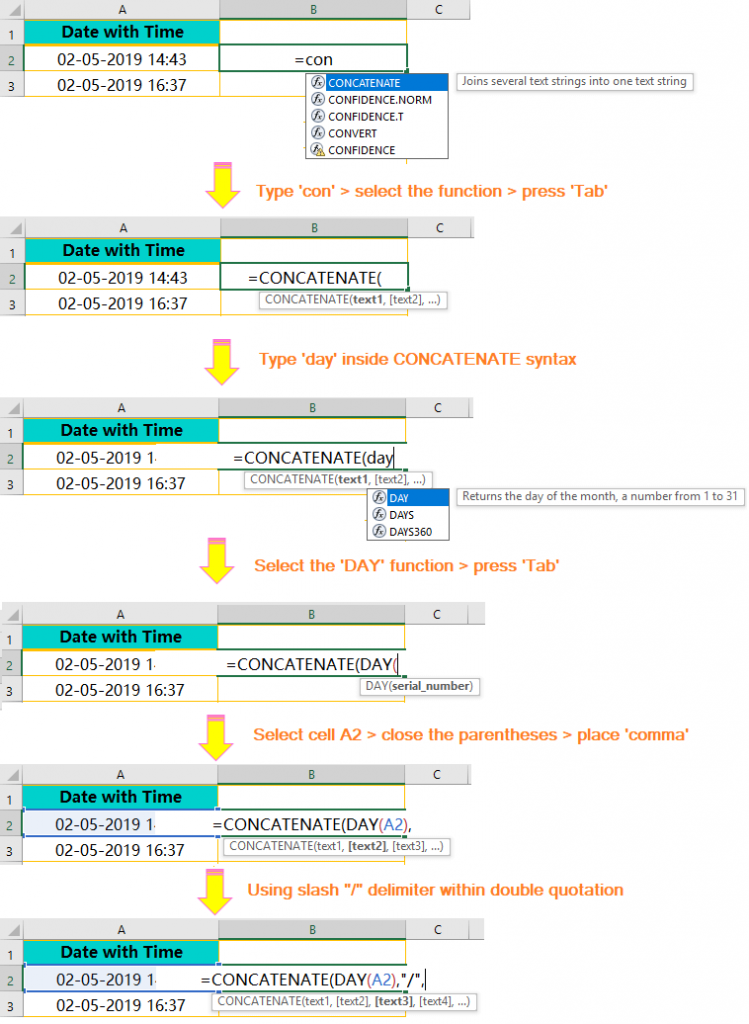
D. EXTRACT DATE FROM TIMESTAMP: USING THE CONCATENATE() FUNCTION
We can use CONCATENATE() function to extract date from timestamp.
The Syntax of the CONCATENATE function is: =CONCATENATE(text1, [text2],…)
• Select the cell (i.e., B2) where to apply the CONCATENATE function. Type ‘con…‘ and select the CONCATENATE function from the drop-down suggestion list with the help of a down arrow (↓). Remember that upper or lower case doesn’t matter.
• Then press the Tab key which allows the opening of CONCATENATE syntax with an open parenthesis.
• We allow the DAY () function within the CONCATENATE function to capture the date from the date-time format. Within the DAY function, select the cell and close the parenthesis. Then place a comma that allows moving to the next argument of the syntax.
• As a next argument, we use a delimiter slash ‘/‘ or dash ‘–‘ inside the double quotation marks as EXCEL read them as text.
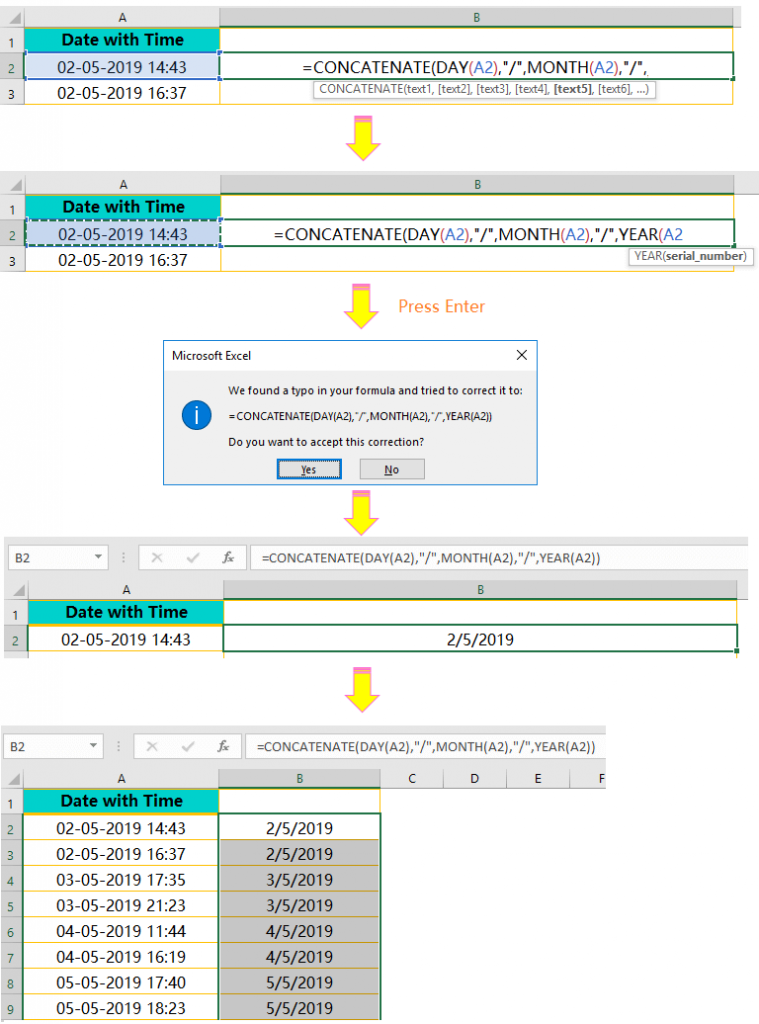
• Then we allow the next function MONTH () to capture the month from the date-time format. As similar to the DAY function, select the cell and close the parenthesis. Then place a comma that allows moving to the next argument of the syntax.
• The next argument, again we use a delimiter slash ‘/‘ or dash ‘–‘ inside the double quotation marks as EXCEL read them as text.
• Then we use the YEAR () function to capture the year. As similar to the above function, select the cell and close the parenthesis.
If we didn’t close the last parenthesis and press Enter, a suggestion pop-up of Microsoft Excel appears. Again press Enter or click on ‘Yes‘, indicating that we want to accept the correction and Excel by default closes all the parentheses.
• A combination of all functions to capture the date from the timestamp. Copy the formula till the end of the range.
• In the next step converts the formula into values with the help of the Paste Special dialog box. We can follow any of the following methods:
➢ Method 1: Copy the range ➪ press Alt+E+S+U (sequentially press Alt, E, S, U) or Alt+Ctrl+V+U (sequentially press Alt+Ctrl+V, U) to select the ‘Values and number formats‘ option ➪ Press Enter or Click OK to accept the condition.
➢ Method 2: or press Alt+E+S+V (sequentially press Alt, E, S, V) or Alt+Ctrl+V+V (sequentially press Alt+Ctrl+V, V) to select the ‘Values‘ option ➪ Press Enter or Click OK to accept the condition.

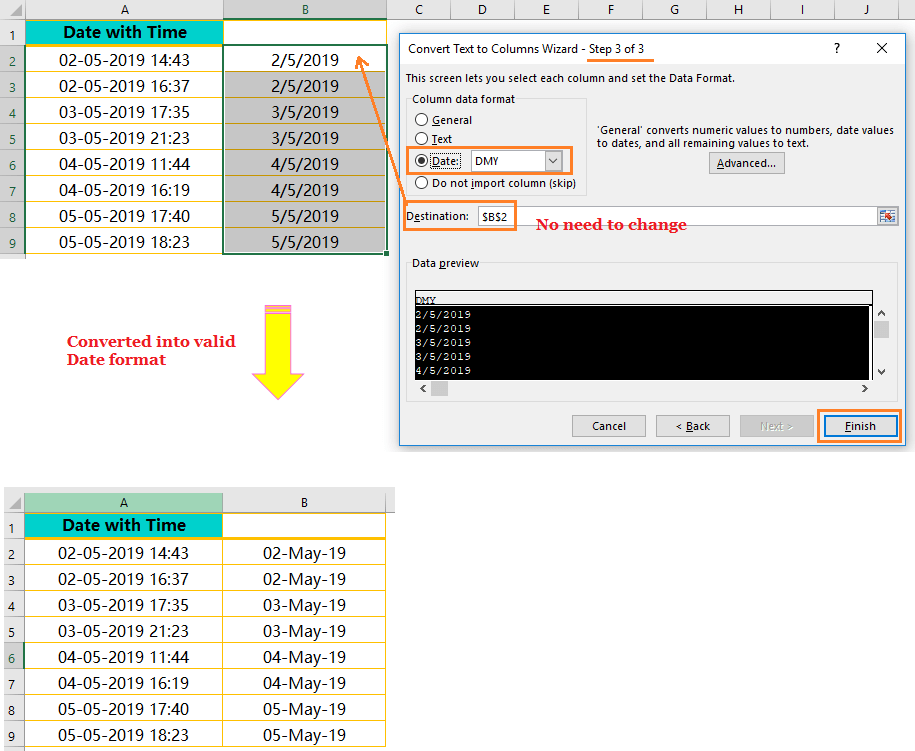
• The date range is not converted into a valid date format by using the Excel shortcut Ctrl+Shift+# or applying the date format under the ‘Format Cells‘ dialog box. There is an easy solution using the ‘Convert Text to Columns Wizard‘.
• Select the range ➪ Press Alt+A+E (sequentially press Alt, A, E) or Alt+D+E (sequentially press Alt, D, E) to open the ‘Convert Text to Columns Wizard‘.
• In Step 1, select ‘Delimited‘ (Excel by default select this option) ➪ Press Enter or click Next.
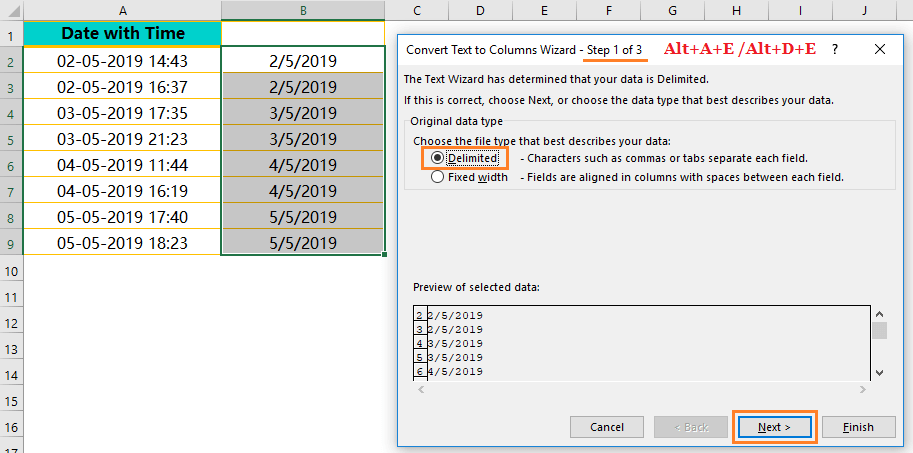
• In Step 2, uncheck all the checkboxes ➪ Press Enter or click Next.

• In Step 3, select the ‘Date‘ option under the ‘Column date format‘ section. No need to change the Destination cell ➪ Press Enter or click Finish to accept the condition.
• As a result, all dates will be converted into a valid date format.
E. EXTRACT DATE FROM TIMESTAMP: USING ALTERNATE CONCATENATE FORMULA
We can use the ampersand sign (&) to concatenate.
Concatenate Date(), Month() and Year() function with the ampersand sign. We should use the slash ‘/’ or dash’-‘ as a delimiter in between the separate functions and make concatenate using the ampersand sign (&).
Now, the formula is =DAY(A2) &‘/’&MONTH(A2) &‘/’&YEAR (A2)
Alternatively, =DAY(A2) &‘-‘&MONTH(A2) &‘-‘&YEAR (A2)

Then we convert the formulas into values with Paste Special dialog box (follow the same process is mentioned above).
Finally, convert the text values into the date format with the help of Convert Text to Column Wizard.
(III). CONCLUSION

If our working database having a combined date and time, then we should use one of the following steps to extract date from timestamp:
(01) We should identify those cells-
• Convert date format to general format
(02) After identification, use one of the following methods to extract date from timestamp-
• Using ‘Text to Columns wizard‘
(i) Convert date format to general format
(ii) Split the point extension after the values
(iii) Convert general format to date format
(iv) Finally, rearrange the data properly
• Using the INT () function
• Using the TRUNC () function
• Using CONCATENATE () function.


Join Our Community List
Subscribe to our mailing list and get interesting stuff and updates to your email inbox.